Showing posts with label How We Save. Show all posts

Thursday, February 19, 2015

The Never-Ending Story of Our Renovation

So we're officially in week 7 of remodeling, which was sort of our deadline, and we sort of met it. I say "sort of" because while we are technically going to move into our house this coming Saturday, it's not entirely functional. But let's look at the bright side, shall we? At least we have a place to live!

This week and last has been focused mostly on the kitchen. We had to get the cabinets installed and pour the concrete countertops. We chose concrete for a couple reasons - we love the look, and it was waaay cheaper than going with quartz or granite. For comparison, the "absolute black" granite that we would have chosen would have been $2K just for the granite, then add in the cutting, polishing, and installation, and it would be just ridiculous. And there's very little we could do to reduce the cost and DIY. The concrete, on the other hand, was about $500.00 for the molds, countertop kit, and concrete, and then it's just a bunch of labor and a giant learning curve.

Installation of the cabinets

The cabinets with Durarock and countertop molds screwed in.

We used the counter kit from Z Counterform. Their videos make it look easy. Warning: it is not. It is also extremely messy! Monkeys throwing wet concrete around would have been only slightly worse. I just walked out of the room while Mike was dealing with it. I couldn't watch.

You have to put wire inside the concrete to give it something to adhere to.

Mike screeding the concrete....right onto the floor.

Screeding is when you level the concrete by drawing something across it, and it has to go somewhere. In our case, it went right off the counter onto the kitchen floor, which thankfully wasn't installed yet. So it landed on the plywood subfloor...still very upsetting for me! But concrete doesn't stick to flat surfaces, so Mike was able to clean it all up in a matter of minutes, and we are no worse for wear. It was a great exercise in just letting things go and believing it will all work out in the end! Seriously, who needs couple's therapy? Just remodel a house.

breaking off the molds to reveal Mike's handiwork!

at this stage, the counters need to cure for a few weeks.

The concrete goes in super dark, but dries a beautiful light gray color. It's modern, industrial, and fits our aesthetics perfectly.

close up of the edge. We may leave the pits, I think they add character!

Yep, we did an undermount sink on a poured concrete counter.

The counters will be curing for about 30 days (whoops! we sure didn't do that on the right timeline) before we can have them polished and then seal them, but they're hard and not susceptible to dents or dings, so we can move in and not worry too much about it. 

Next things to do - paint and put in the floors. 

painting with the new neutral - gray.

painting walls with vaulted ceilings is a lot of work!

I wanted light floors and Mike wanted dark. Since we wanted to go cheap (no one in the neighborhood has hardwood, so it didn't make sense to go all out), we went with a nice dark laminate that mimics hand hewn wood. Laminates have come a pretty long way since the first days of Pergo! As Mike and Tyler (our new BFF contractor friend) did the floor installation, I couldn't imagine how much dust hardwood floors would be to install, if laminate kicked up this much dust.

installing the floors in the living room.

Mike cut and installed all the underlay on the floors.

Kitchen floors installed. Please excuse our dust.

One major cost cutting factor in our remodel is the electric - my part time job is for an electrician, so we are getting parts at cost, and a big discount on labor. We installed six super nice, adjustable recessed LED lights in our living room. 

four of the six lights installed.

Finally, a glimpse at our almost completed bathroom! The tile is all in, the vanity is half installed, and I've got a first coat of paint on the walls. We may be living without the glass wall or door for a little while, as we're off to Chicago and LA next week, and we're strapped for time. I never thought I'd ever say this, but I can't wait to stop traveling and just stay home for a few months!

two views of the new bathroom


a peek into the shower from the vanity area

We move in this weekend and while we're living there, we'll still be finishing up all sorts of projects - installing the mirrors, pendant lights, and rest of the vanity for the master bath, all the trim, new doors (or possibly painting the old ones), kitchen backsplash, hood, shelving, closet organizational system, full remodel of the guest bathroom, and oh yeah - a secret reading area hidden by a swinging bookcase. And did I mention I bought a bunch of heirloom seeds for our not-yet-created garden and raised beds? It's going to be a busy spring!


Saturday, January 31, 2015

Renovation Round 3

Mike preparing to climb into our attic space.

Skim coating the walls - it never ends.
It may not look like it from the pictures, but we are almost done, I swear. OK, OK, we do still have the floors to install, kitchen cabinets, sink, countertops to pour (we're doing concrete), backsplash, paint...and don't even get me started on the yard...but the bulk of the skim coating is done.

It's been a labor of love and/or hate. To give you a price comparison on skim coating, it would have cost us at least $2500 or so, in labor alone, to skim coat all the walls and ceilings. Eek! We did a huge chunk by ourselves, but our friend Dylan is helping us with the final bits, thankfully.

Using power tools to mix compound to the right consistency!

The picture below shows the wall next to the window frame. The farthest right (closest to the wood) is what the walls looked like with one layer of joint compound on them. A little over to the left is with two coats, and the furthest to the left is with three coats and a light sanding. After that, you wipe down/vacuum the walls, primer, caulk the corners and anywhere the walls meet, and then finally, paint.

A section of wall that shows how much work we've done.

Our beautiful, smooth, flat, white walls, ready for paint colors...

Our other giant project, which we've needed professional help on, is the master bathroom. We spend tons of time hovering and asking questions from the tile guy, plumber, dry wall guys, and the general contractor, to learn as much as we can (so hopefully we can do this ourselves in the future).

The bathroom framed out.

Mike can hang dry wall, move a few electrical switches, and put in insulation, etc, but it's nice to have guidance on the other things, like framing (and things you have to be licensed for). This is also a great way to learn how much things cost, and how much actual labor goes into each step. Spoiler alert: it's a lot. Pay those guys.

The master bath with some of the insulation and drywall/tileboard up.

The tile guy, Adin, graciously let me lay the first tile!

Tiling the bathroom was super exciting, because we could finally see the light at the end of the tunnel. Once some of the tiles were laid, we were able to envision how gorgeous our brand new bathroom would be! Adin, who owns Artisan Tile and Stone, was our super cool tile guy who was nice enough to tell us what he was doing, every step of the way, so we could do it for ourselves in the kitchen.

The shower with most of the tile in.

The shower shelf/cubby for shampoo and what not.

I picked that awesome hexagon tile above, because my current fascination is bees! I have been following @girlnextdoorhoney on Instagram, and I just love her feed. Anyways the shower cubby is my new favorite thing in the house, because it looks like a little beehive. The soap cubby and the shower floor will have the same tiles - 2" white hexagons. 

Here's a remodeling tip: the two most important rooms in which to invest your remodel money, are the bathroom and the kitchen. This hexagon tile was the most expensive thing we've used so far, at about $7/sq ft (which, if you've researched tiles, is still pretty dang cheap). Try to use your "expensive" stuff in a small visible space, so it "pops" and makes the whole room look expensive. With the bathroom floor, walls, and shower all in the gray tile, the shower floor, the cubbies and our little vertical accent strip of white hexagons will really stand out!

Aside from skim coating (which I got lots of compliments on - yay, add it to my resume), I am also very good at putting together IKEA furniture. So, I tackled this project:

IKEA furniture - gives you a sense of accomplishment once you're done!

...which will eventually be our bathroom vanity. I like to use IKEA for a few things here and there - mix it in with your regular stuff and it's an affordable way to upgrade your look.

And now, we interrupt our remodel to go on vacation! We are sooo excited to share this vacation with you, so check back next week for a sneak peek!


Can you guess where we're headed?


Sunday, January 4, 2015

New Year, New House!

Mike and I have been living in Bend, on and off while traveling, for 8 months now, and we know that this will be our home for the forseeable future. So, we bought a house! It is a great way to set the tone for this year, since it's a fixer upper.

Houses are much, much less expensive here in Bend than they are in Los Angeles. You can buy a home - like an actual house, with a yard - within the city limits for somewhere between $150K-$300K on the low end. It's close to the downtown area and there's lots of couples like us, families with dogs, and tons of Subarus. It was also the smallest home we could find; there seems to be a trend of huge homes here, like 2000 square feet and up! We wanted one the same size as our loft in Los Angeles - 900 square feet or less. We had to settle on this one, at 1200 square feet. 

Mike about to walk in to our new home!

I like small homes for the intimacy, and the fact that it keeps us from accumulating a bunch of junk. Also, they're more environmentally friendly because they take less to heat/cool and less to maintain. 

My favorite part about this house is that it has a yard and an apple tree! It's pretty gross right now because the former occupants used the yard as a dog run. But we'll get it cleaned up this spring/summer and post some pics. I can't wait to grow our own food.

The house was a rental for 20+ years and as you can imagine, it is used and abused. And it smells like dog pee. The first day after escrow closed, we went and bought floor sealant - we're ripping out all the wall-to-wall carpet and shellac-ing the floors, then putting in dark wood.

Mike standing in the stinky living room.

It has 3 bedrooms and 2 bathrooms, so plenty of room for our guests and family. And like all homes I've lived in my whole life, it has vaulted ceilings, which I just love.

The house was built in the early 90s and I'm pretty sure not a thing has been changed since then. In fact, during escrow, the furnace finally died and the seller had to replace it. Lucky break for us!

The totally 90s kitchen with the original appliances.

Since I love to cook, I'll be installing a gas stove in the kitchen, among other things. And we'll be redoing the whole kitchen ourselves. I'll be sure to post about our successes and failures/learning experiences along the way, of which I imagine there will be many...I've never done a single remodel or construction project in my life, other than painting a wall. Thankfully, there's always Mike and Google.

Getting down and dirty, pulling off the baseboards.

The very first night, we were so excited, we started pulling off all the baseboards. I'm obsessed with getting rid of the floors (and the smell) ASAP. Luckily, we don't have to live here while we're renovating, assuming we can get it done in the next 7 weeks...HA.

One of my first projects today was to get rid of the disgusting texture on the walls. Seriously, who takes a perfectly good wall and then ruins it with texture?! It boggles my mind. 

This is known as "splatter knockdown," and it is horrid.

So you have 3 choices with textured walls -  remove the wall and get new drywall, live with it, or go through the awful, time consuming and labor intensive process of covering it up. We're going with option #3, after hours of watching YouTube videos like this and this.

Those videos weren't kidding because the process sucks. You're basically filling in the dents with plaster. This is the wall after 1 coat of joint compound. 2-3 more coats to go, then sanding...

Honestly, this is much improved. I have hopes for the next 2 coats!

There are lots of things that Mike and I do together, that could be considered really good relationship training. Obviously, there's travel and road trips, which will for sure test your communication and patience. And then there's remodeling. It's a whole other beast. We're learning that it's best if he works on one job, and I work on another. Then you can encourage each other and compliment a job well done...allowing each individual to get that job done however they want (and without supervising). In other words, just let a person do the damn thing. It's all the same at the end. That's my relationship advice, anyway.

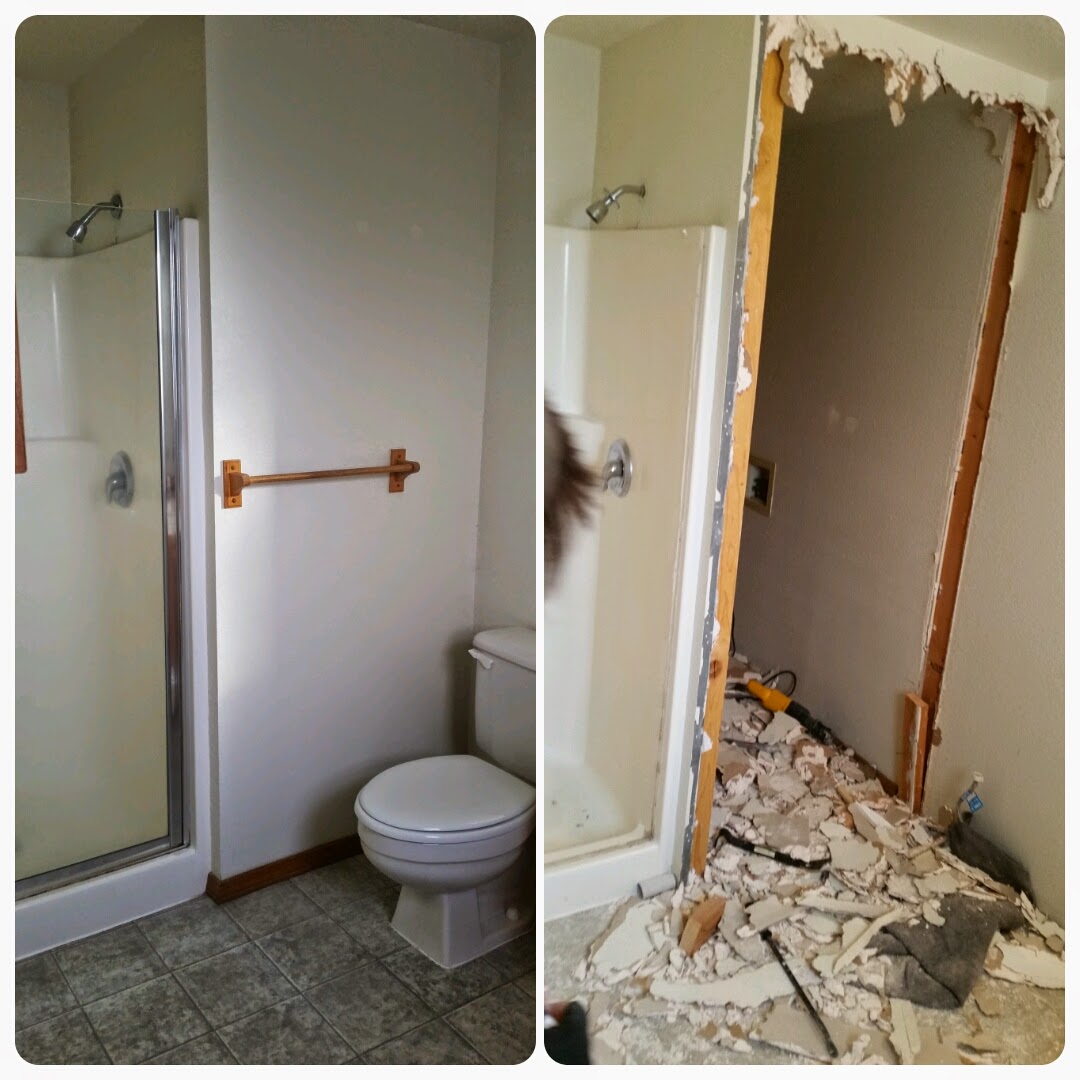
So while I was finessing the textured walls, Mike was making a bunch of noise, blasting his music, and using his tools in the most manly way possible. Before and after shots of our master bath:

Removed the dated vanity, toilet, and all the fixtures.

We're completely gutting the bathroom. Yes, this is a very ambitious undertaking for two people with very little renovation experience. What can I say, we love learning new things!

Mike knocked down the wall in the bathroom to reclaim this weird, underused back space in the utility closet. That new space will be a larger, rectangular walk-in shower that extends to the vanity. The former shower space will be the toilet alcove.

got a little shot of his hair in the "after" photo, whoops!

Not a bad day's work! Now we just need to find a plumber...


Monday, October 13, 2014

The Marvels of Mycology

This weekend, we joined the North American Truffle Society on a mushroom foray. It was held at the HJ Andrews Experimental Forest, on the other side of the Cascade mountain range (the rainy side). It's less than 2 hours from Bend. 


part of the Blue River, which is very low this time of year.

Even though it's been raining up here, this is less rain than they normally get, and the Blue River Reservoir was dry, and the river was running super low. The drought's not just in California, unfortunately.


Big Willy! He's available for rental, just contact us.

We took Big Willy to camp in, instead of staying in the provided housing. He's just so comfortable, that we'd rather sleep in him and have the privacy - plus, it was only $5/night to camp, versus $50/night for a room with a shared bathroom. Major deal - a weekend away for $10!

We arrived Friday and met some of the other participants; everyone was super nice and mostly normal, with a shared love for 'shroomies. Us and one other couple were the only newbies, but it turns out, even the experienced people needed help from the 4 experts on identifying mushrooms. There are just so many types of mushrooms that it's impossible to know them all. Tons of mushrooms aren't even named or identified yet.

All day Saturday was spent hiking and foraging, and getting drenched.

Mike on the trail with our fellow mushroom hunters.


Me on the bridge.

the hike alone was worth it - it is beautiful here.

We were not well prepared for the rain (being from LA), but live and learn! Next time, we will bring rain gear and lots of extra clothes. Also, we had to borrow some neon tape to mark ourselves (you can see it tied around our arms in the above pictures). We were deep in the forest and it's hunting season (and Mike's wearing a hat with horns)...

a perfect example of Angel Wings (Pleurocybella porrigens).

The people on the foray were obsessive about mushrooms. Total mushroom geeks. In fact, some of them have PhDs in mycology and have written books. So, we learned more than we ever thought we would about mushrooms, including the latin names, and how they grow and reproduce. It was fun, being around people who are so passionate about something. That's what I'm searching for, for my life - one singular thing that I'm obsessively passionate about.

Shelf mushrooms, also known as conks. Beautiful, but you can't eat them.

Mike was a bit like Bigfoot with his Yeti hat on...

By the end of Saturday, Mike and I were able to positively identify 4 kinds of edible mushrooms - white and yellow chanterelles, winter chanterelles, and hedgehogs! I can't explain the feeling of accomplishment you get from foraging, and this type of learning. It just feels so useful. We can't wait to do this again.

Our haul - winter chanterelles in the basket, white and yellow chanterelles on the table.

After the foray, everyone gathered to clean and sort the mushrooms, and identify the weird ones. We cooked them up and had a potluck - mushrooms sautéed in wine, in butter, in bacon, over pasta, with pesto, with kale, in soup, with cream - and just plain with salt and pepper, so we could try every single type and taste the differences. Mike and I tried lobster mushrooms (they actually taste and look like lobster! see the red blob in the picture below), fried chicken mushrooms (which smell like fried chicken while they're cooking, but taste like nothing), all the various chanterelles, honey mushrooms (bleh, despite the name), angel wings, and oyster mushrooms. All those mushrooms were found on the foray, by various members of the group, and fed FIFTEEN people with tons of leftover mushrooms.


Random mushrooms everyone collected and identified.

It is amazing how much free food is out there, for the picking. And you get to hike in a gorgeous forest, too. I think I'm falling in love with Oregon!

Friday, October 10, 2014

Fall Foraging in Oregon

We are officially back in Oregon for the next few months, and so happy about it! Traveling was eye-opening, fun, and it was so great to see our friends, but there is nothing like your own bed, or your own couch.


I think the kitties missed us at least as much as we missed them!

Since we were in Asia for 3 weeks, it took us about 5 days to really get over our jet lag. But it was a great time to reconnect with our pets and get our fridge restocked, and we took some walks around our neighborhood. While we were gone, fall came to Central Oregon!

The fall colors at the Bend Fall Festival.

one of the many parks near our house.

driving around town - look at all that yellow!

While walking back from the Bend Fall Festival, I spotted a plum tree sitting on a vacant lot. After trying a few and determining that they were, in fact, plums, I went back the next morning and foraged a whole bag.


Then I proceeded to make wild plum jam! Here is the recipe I used, although, because I have no idea how much my plums weighed, I sort of winged it. I also used a little pear juice and only 4 cups of sugar, because 5 cups of sugar seemed a bit much.

All the plums, washed and ready to be pitted.

Threw them in a pot and added sugar...

They came out a beautiful red color.

The finished product! 24 jars - enough to give away.

It was really fun. So fun, in fact, I went ahead and tried to forage apples around the neighborhood (there are like 8 trees within a 2 block radius of our house). But it's the tail end of apple season, and almost all the apples have worm holes. So, I just bought some Honeycrisp apples on sale, and made applesauce.


It's easy, just put the apples in the pot, cores, skins and all, with spices.

I added a cinnamon stick, cloves, and a secret ingredient when I cooked them down. Mike said it's the best he's had (and he is picky!). No sugar needed, which I think is awesome. 

The food mill removes all the stems, skins and cores without wasting any apple.

Last time I made applesauce, with my friend Sheila, she had an automated food mill. This time, I had to use a manual food mill, and man, it gives you a workout!

The applesauce, ready to be canned!

The finished product!

So 5 pounds of apples only made three 12-ounce jars of applesauce (plus a little for eating immediately), sadly. Apples are cheap around here - I can get Gala apples for $0.68/pound, but I wanted to try these Honeycrisp apples, which are $0.89/pound. Not too bad, but I found an orchard which lets you pick them for FREE, which I will be doing next year; by that time I should be pretty good at canning applesauce.

In consolation I made us a Buttermilk Spice Cake. Nothing says fall like spiced-something.

The batter came out pretty thick since I don't have a Kitchenaid mixer.

I followed the recipe mostly (if you know me, I love to experiment), but with a little less sugar, and I made my own cinnamon/nutmeg glaze with a hefty amount of cinnamon, nutmeg, powdered sugar, and just a touch of milk. It came out really tasty and a great consistency. 

The cake was light, moist and fluffy - yum.


We are continuing our foraging this weekend on the Mushroom Foray we signed up for, about a month ago, with the North American Truffling Society. Here's to hoping we learn something useful!

our new truffle rake, brushes, and basket for collecting 'shrooms!